Looking to enhance your TV’s audio experience? Wondering how to connect a YAMAHA soundbar to a TV? Well, you’re in the right place! In this article, we’ll guide you through the simple steps to seamlessly connect your YAMAHA soundbar to your TV, allowing you to enjoy high-quality sound while watching your favorite movies, TV shows, and sporting events. Say goodbye to low volume and muffled dialogue – let’s get started!

How to Connect a YAMAHA Soundbar to a TV?
Introduction:
Having a high-quality sound system can greatly enhance your television viewing experience. YAMAHA soundbars are known for their excellent audio performance, making them a popular choice for many users. If you’ve recently purchased a YAMAHA soundbar and you’re wondering how to connect it to your TV, you’re in the right place. In this article, we’ll guide you through the process step by step, ensuring that you can enjoy immersive sound while watching your favorite movies, shows, or sports events.
Table of Contents:
1. Types of Connections
2. Connecting the YAMAHA Soundbar to the TV
2.1 HDMI Connection
2.2 Optical Connection
2.3 RCA Connection
3. Adjusting the Soundbar Settings
4. Troubleshooting Tips
5. Conclusion
1. Types of Connections:
Before moving on to the actual steps, it’s essential to understand the different types of connections available for connecting your YAMAHA soundbar to the TV. The most common options include:
– HDMI: HDMI connections offer the best audio quality and support for surround sound formats. They are versatile and can transmit both audio and video signals.
– Optical: Optical connections, also known as TOSLINK connections, are an alternative to HDMI. They support digital audio transmission and provide good sound quality.
– RCA: RCA connections, commonly known as analog connections, use red and white cables to transmit audio signals. While they are not as advanced as HDMI or optical, they can still provide decent audio quality.
Now that we have an understanding of the different connection options, let’s move on to the step-by-step process of connecting your YAMAHA soundbar to your TV.
2. Connecting the YAMAHA Soundbar to the TV:
2.1 HDMI Connection:
Step 1: Check the available HDMI ports on both the soundbar and the TV. Ensure you have an HDMI cable that matches the HDMI version supported by your devices.
Step 2: Connect one end of the HDMI cable to the HDMI OUT port on the YAMAHA soundbar.
Step 3: Connect the other end of the HDMI cable to the HDMI IN port on your TV.
Step 4: Turn on your YAMAHA soundbar and TV.
Step 5: On your TV, go to the settings menu and select the audio output options. Choose the HDMI input corresponding to the soundbar.
Step 6: Test the connection by playing some audio or video content. You should now be able to hear the sound from the YAMAHA soundbar.
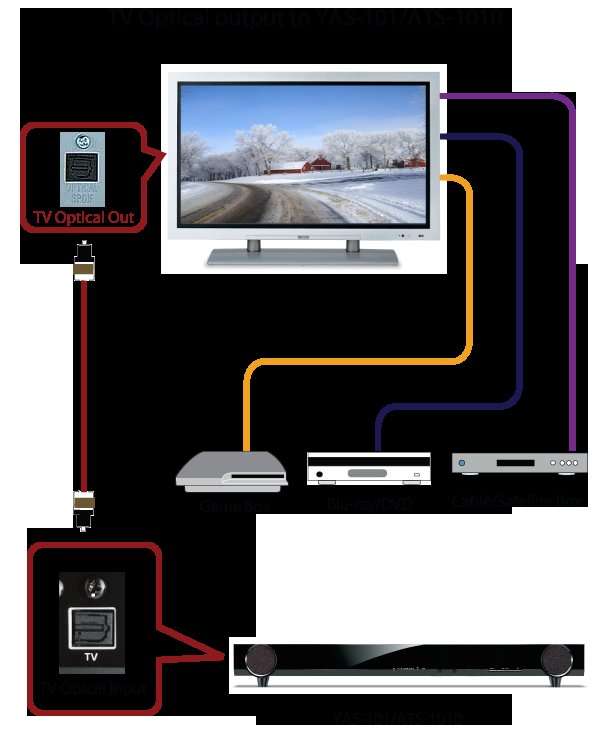
2.2 Optical Connection:
Step 1: Locate the optical audio output port on your TV. It is usually labeled as “Optical” or “Digital Audio Out.”
Step 2: Connect one end of the optical cable to the optical audio output port on your TV.
Step 3: Connect the other end of the optical cable to the optical input port on the YAMAHA soundbar.
Step 4: Power on the soundbar and TV.
Step 5: On your TV, access the audio settings and select the audio output to be transmitted via the optical connection.
Step 6: Test the connection by playing audio or video content. You should now hear the sound through the YAMAHA soundbar.
2.3 RCA Connection:
Step 1: Locate the RCA audio output ports on your TV. These are usually color-coded as red and white.
Step 2: Connect one end of the RCA cable to the corresponding audio output ports on your TV.
Step 3: Connect the other end of the RCA cable to the RCA input ports on the YAMAHA soundbar.
Step 4: Turn on both the TV and the soundbar.
Step 5: On your TV, access the audio settings and switch to external speakers or audio output through RCA.
Step 6: Test the connection by playing audio or video content. You should now hear the sound through the YAMAHA soundbar.
3. Adjusting the Soundbar Settings:
Once you have successfully connected the YAMAHA soundbar to your TV, you may need to adjust some settings to optimize the audio experience. Here are a few key settings you can consider:
– Sound Modes: YAMAHA soundbars often come with different preset sound modes such as movie, music, or sports. Experiment with these modes to find the one that suits your preferences.
– Audio Sync: If you notice any audio delay while watching content, your soundbar may have an audio sync feature. Adjust the audio sync settings to eliminate this delay.
– Subwoofer Level: If your YAMAHA soundbar comes with a subwoofer, you can adjust the subwoofer level to enhance the bass according to your liking.
– Equalizer Settings: Some YAMAHA soundbars allow you to adjust the audio frequencies manually. Use the equalizer settings to fine-tune the sound output.
Remember to consult your YAMAHA soundbar’s user manual for specific instructions on adjusting these settings, as they may vary between models.
4. Troubleshooting Tips:
Sometimes, despite following the connection steps correctly, you may face issues with the soundbar-TV setup. Here are a few troubleshooting tips to help you resolve common problems:
– Ensure all cables are securely connected to their respective ports.
– Update the firmware of your YAMAHA soundbar if available. This can often fix compatibility issues.
– Check the audio settings on your TV and make sure the output is set to the connected soundbar.
– Test the soundbar with a different audio source to determine if the issue is with the soundbar or the TV.
– Restart both the soundbar and the TV to refresh the connections.
If you encounter any persistent issues, it’s advisable to contact YAMAHA customer support or seek assistance from a professional technician.
Conclusion:
Connecting a YAMAHA soundbar to your TV can significantly enhance your audio experience, bringing movies, shows, and music to life. By following the step-by-step instructions provided in this article, you should be able to connect your YAMAHA soundbar to your TV using HDMI, optical, or RCA connections. Additionally, adjusting the soundbar settings can further optimize the audio output to suit your preferences. Remember to troubleshoot any issues that may arise and enjoy your immersive sound experience with your YAMAHA soundbar and TV setup.
Connecting Yamaha Soundbar to TV with HDMI ARC
Frequently Asked Questions
How do I connect my YAMAHA soundbar to my TV?
Connecting your YAMAHA soundbar to your TV is a straightforward process. Here’s a step-by-step guide:
What cables do I need to connect my YAMAHA soundbar to my TV?
Depending on the available ports on your TV and soundbar, you will typically need an HDMI cable, an optical cable, or a 3.5mm audio cable. Check the ports on both devices and use the appropriate cable.
Can I connect my YAMAHA soundbar to my TV wirelessly?
Yes, many YAMAHA soundbars offer wireless connectivity options, such as Bluetooth or Wi-Fi. If both your soundbar and TV support wireless connections, you can pair them together without the need for cables.
How do I connect my YAMAHA soundbar using an HDMI cable?
To connect your YAMAHA soundbar to your TV using an HDMI cable, follow these steps:
- Identify the HDMI ARC (Audio Return Channel) port on your TV.
- Connect one end of the HDMI cable to the HDMI ARC port on your TV.
- Connect the other end of the HDMI cable to the HDMI OUT or TV OUT port on your soundbar.
- Ensure that both devices are powered on.
- On your TV, navigate to the audio settings and select the HDMI ARC input as the audio output.
How do I connect my YAMAHA soundbar using an optical cable?
If you prefer to use an optical cable, here’s how to connect your YAMAHA soundbar to your TV:
- Locate the optical audio output port on your TV.
- Connect one end of the optical cable to the optical audio output port on your TV.
- Connect the other end of the optical cable to the optical input port on your soundbar.
- Make sure both devices are powered on.
- Access your TV’s audio settings and select the optical output as the audio source.
Final Thoughts
To connect a YAMAHA soundbar to your TV, simply follow these steps. Firstly, check if your TV has an HDMI ARC (Audio Return Channel) port or an optical audio output. If it has an HDMI ARC port, connect one end of an HDMI cable to the soundbar’s HDMI ARC port and the other end to the TV’s HDMI ARC port. If your TV has an optical audio output, connect one end of an optical cable to the soundbar’s optical input and the other end to the TV’s optical output. Once the physical connections are made, adjust the audio settings on your TV to select the appropriate audio output. Now, you can enjoy the enhanced sound experience of your YAMAHA soundbar connected to your TV. So, if you’re wondering how to connect a YAMAHA soundbar to a TV, simply follow these easy steps for a seamless audio setup.